Custom silicone development · RTV mold MOQ from 20 · DFM & prototype support

WhatsApp +86 135 3006 2969

RUUIPONRUUIPON

Molds, castings and project review

Custom Silicone Project Case Studies

See examples of mold geometry, cavity layouts and release. Use the notes below to prepare a brief for your own project.

Mold and Casting Examples

Explore the visible features in each example, the decisions they raise for a comparable mold, and the information to include in your quotation request. The review and trial steps below describe what to agree for your own project.

White silicone gummy tray with repeated small round cavities across one sheet
Round cavities repeat across a single flexible silicone tray.

Round-Cavity Gummy Tray: Layout and Filling Review

The photograph shows the cavity pattern and the space between cavities. That layout is the starting point for discussing a tray that can be filled, moved and emptied within the buyer’s available working area.

Design decisions
Agree the finished piece dimensions before repeating the cavity. For depositor filling, compare cavity centers with the nozzle drawing and check the indexing direction. For hand filling, review access to each row and the support needed while carrying a filled tray.
What to send for a similar mold
Send the intended formula, target grams or measured dimensions, cavity count, maximum tray size and the filling method. Include the nozzle pitch and carrier dimensions when a machine determines the layout.
Prototype checks to agree
Use the real gummy formula to check fill level, piece weight and release. Review a complete filled tray for support and handling. Record any cavity or spacing changes before approving the repeated layout.
Plan a custom gummy tray
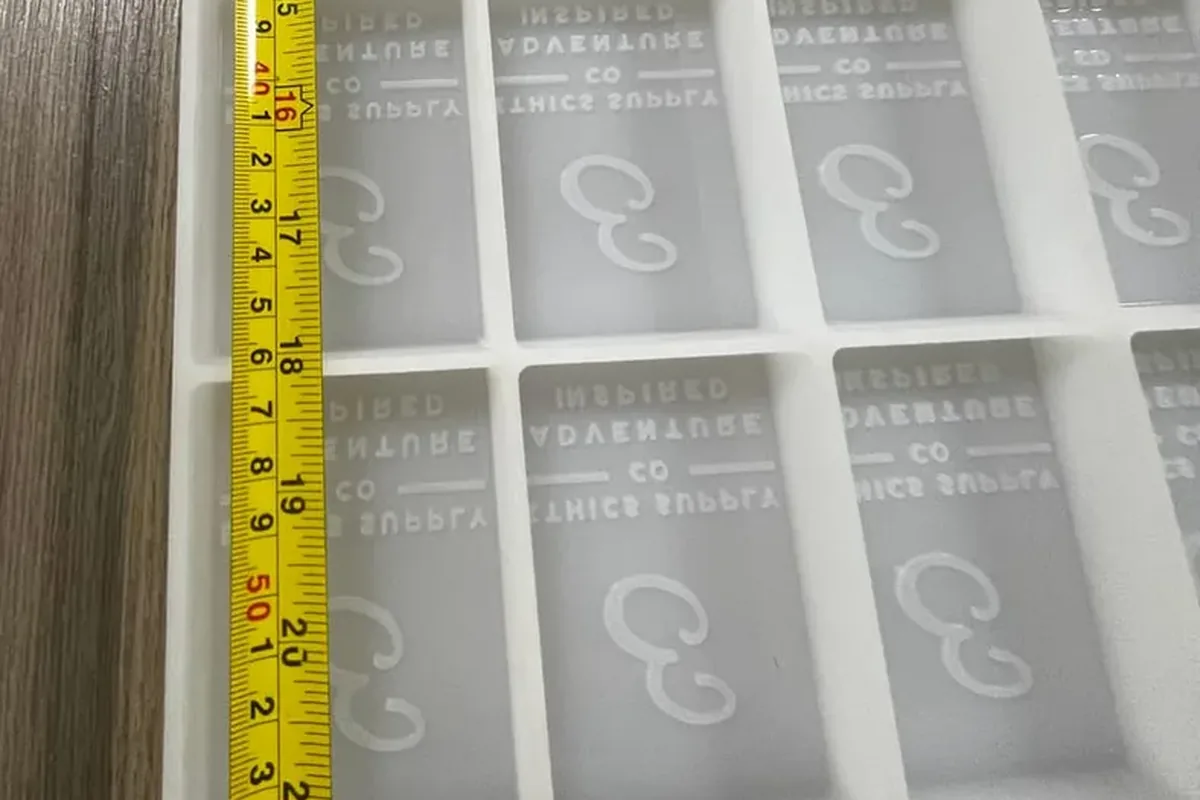
White silicone chocolate tray with four rows of seven square cavities and repeated logo detail
The photographed tray has four rows of seven square cavities: 28 cavities with repeated branding detail.

28-Cavity Logo Chocolate Tray: Artwork at Finished Size

The same cavity outline and logo repeat across the tray. The useful design question is whether that branding reads clearly at the finished chocolate size while leaving enough space for filling and release.

Design decisions
Review the logo as raised or recessed on the finished chocolate, then confirm the corresponding cavity geometry. Check fine lettering, narrow gaps and edges at actual size. Agree the outer tray limits and the support used during filling and cooling.
What to send for a similar mold
Send vector artwork if available, finished piece dimensions or target weight, the desired logo relief, chocolate type and quantity of molds. Include packaging dimensions if the finished piece must fit an existing insert or wrapper.
Prototype checks to agree
Approve the artwork and cavity drawing, then evaluate the logo, edges, fill and release with actual chocolate. Use the sampled piece for the weight and packaging check before repeating the approved design across a production tray.
Specify a branded chocolate mold
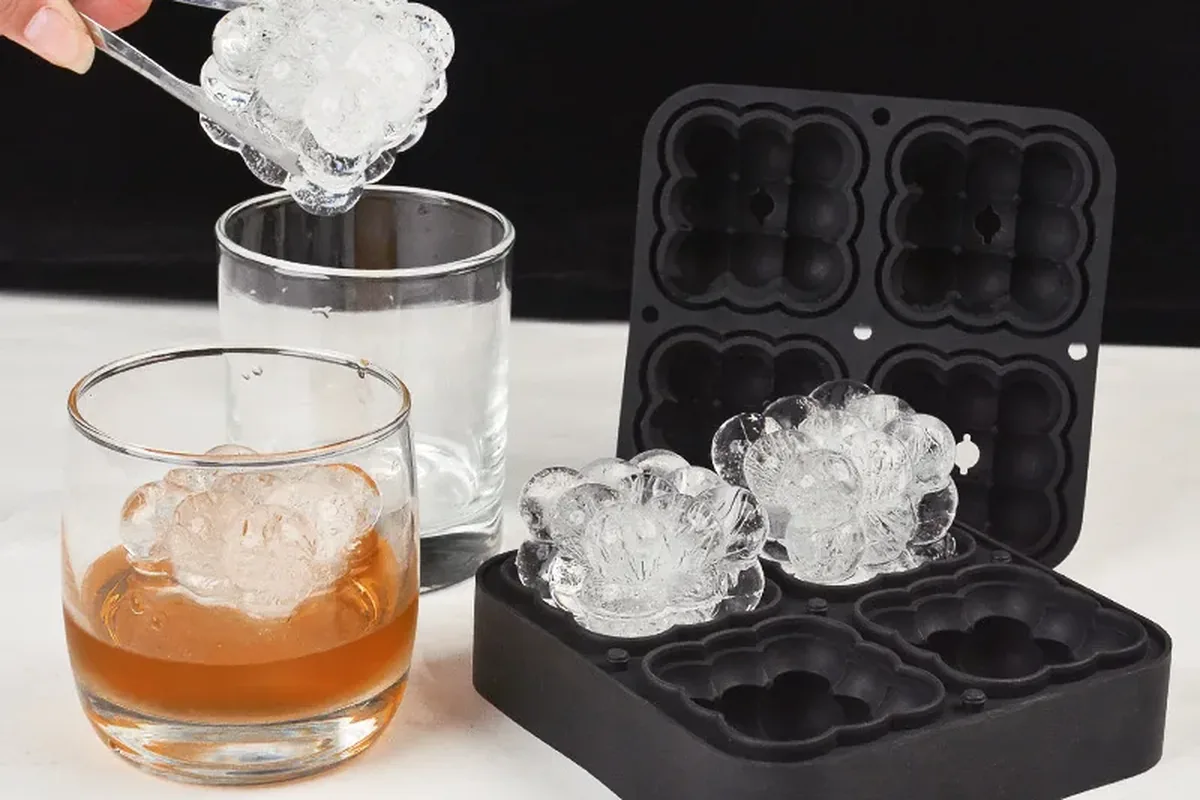
Two black silicone mold halves with four shaped ice cavities, fill openings and finished ice pieces beside glasses
Two mold halves, four shaped cavities and finished ice pieces are visible together.

Four-Cavity Shaped Ice Mold: Halves, Fill Openings and Release

The photo shows how a three-dimensional shape is divided between two mold halves. Small openings in the upper half provide visible filling access, while the finished pieces show the shape being discussed.

Design decisions
Review the split location, alignment between halves, filling access and the path used to remove the frozen piece. Confirm how the filled assembly will sit level and remain closed in the freezer. Evaluate the actual glass opening as well as the desired ice dimensions.
What to send for a similar mold
Send drawings or measured reference views, the intended ice size, cavity count, glass opening and freezer-space limits. Explain whether filling will be manual and how the assembled tray will be supported and handled.
Prototype checks to agree
Run a complete fill, freeze and demold trial with the intended setup. Check closure, filling access, release around projecting details and fit in the glass. Agree any change to the split, openings or outside dimensions before repeat production.
Review a shaped ice mold

Browse Each Project Review

Open any review below for the full design decisions, the brief to send, and the prototype checks to agree for that application.

Soap Demolding Demonstration

Watch how a soap piece is released from the flexible cavity. Look at the release path and the detail on the finished piece.

Your formula, mold structure and working process still need their own review. One demonstration does not establish the lifetime of a mold or compatibility with every soap formula.

Prepare a soap mold brief

What to Confirm for Your Own Project

  1. Starting design: identify the drawing, CAD revision, measured sample or reference images and what still needs to be defined.
  2. Structure and material: agree the release direction, splits, cores, support and the intended casting material or end use.
  3. Prototype evidence: decide which dimensions, weight, surface, fit or release features must be checked and how.
  4. Production reference: confirm the approved revision, acceptance criteria and commercial scope before repeating the mold.
Understand prototype and tooling scope

Questions About a Comparable Project

Can you make the same shape in a different size?

Send the target size and material being cast. Changing scale can change release, support and handling, so the structure needs a fresh review.

Can I start with a photo instead of CAD?

Yes. Include measured views and explain the intended use. The modeling scope, deliverables and any fees are confirmed before paid design work starts.

Can I request more evidence before ordering?

Specify the process, feature or document you need to review. Available examples and any project-specific prototype or test work can then be discussed without disclosing another customer’s confidential design.

Have a Comparable Mold Project?

Send your drawing or measured photos, casting material, key dimensions, cavity count, mold quantity and destination. Mention any confidentiality requirement before sending sensitive files.